Let’s create an oscillator with much less aliasing! This is an optional improvement, you don’t have to do it. Our SpaceBass synth will work the same as before, but it will sound much better in higher octaves.
Analyzing the Spectrum
I’d like to introduce a very good free plugin: Voxengo SPAN. Basically you can insert it on a track, and it will show you the spectrum of the signal going through it. We’re not quite ready to write our own FFT testing routines, so this will be indispensable to compare different algorithms and see what’s going on.
Download and install it. Run the SpaceBass plugin in REAPER, open its GUI and make sure that:
- The oscillator Mix knob is turned all the way to the left (so you only hear oscillator 1)
- Oscillator 1 is set to the square waveform
- Filter cutoff is at max, resonance at min
- Filter LFO amount is at min, env amount is in central position
With these settings, you can hear the raw waveform of oscillator 1. Now insert the SPAN plugin right after SpaceBass. Play a fairly high note (I used A6), and you should see something like this:
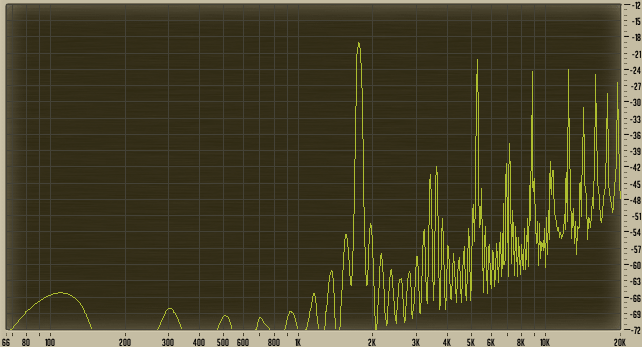
Here’s how to read this graph: The x axis is the frequency (in Hz), going from 66 Hz to 20 kHz here. The spacing is logarithmic, which just means that the space between octaves is always the same: The gap between C1 and C2 is the same as the gap between C7 and C8. Octaves have a ratio of times two, but harmonics are just multiples of the fundamental frequency. This means that harmonics are not spaced evenly in the graph. The y axis is the amplitude (in decibels). So you can see at a glance which frequencies are currently present in the signal.
Depending on your settings, it may look a little different, but it’s clear that there’s something wrong: For a square wave, you’d expect a series of peaks that decrease in volume (the higher the frequency), with nothing in between. Especially not below the fundamental (i.e. in the left portion of the above image). As described before, this is called Aliasing.
So what do we do about it? There are different solutions. You get the best results by synthesizing a Fourier series to approximate the square waveform. This just means that you layer sine waves with the correct amplitudes (starting at the fundamental, and one for each harmonic), but you stop when you reach the nyquist frequency. This additive approach would give a perfectly bandlimited waveform (i.e. one that only has spectral content from the fundamental to the nyquist frequency).
Of course there’s a catch. This method may be good for high octaves (where the fundamental is so high that there aren’t many harmonics until the nyquist frequency). But for low octaves you have to layer a lot of sine waves: If you’re working at a sample rate of 44.1 kHz, a saw wave with a fundamental of 100 Hz will have 219 harmonics until the nyquist, so you’d have to calculate a total of 220 sin() values every sample. Of course, in a polyphonic synth, multiply this by the number of notes being played.
You could argue that you only have to do the layering once for every played note. This is true as long as you don’t have any pitch modulation. With pitch modulation, the frequency can change every sample, so it’d be a lot of work to layer the sine waves again and again.
BLIPs and BLEPs
There are other approaches, most notably:
- Bandlimited Impulse Train (BLIT)
- Minimum-Phase Bandlimited Step (MinBLEP)
- Polynomial Bandlimited Step (PolyBLEP)
The two BLEP approaches are based on the fact that the aliasing is only caused by the sharp jumps in the waveform. With the waveforms we currently have, only the sharp edges are the problem. So can we just round them like a piece of wood? Just rounding the edges would be equivalent to gentle low-pass filtering, which is not what we want. We want no filtering up to the nyquist frequency, and nothing above that. We want the same result as if we had layered sine waves.
A square wave created from sine waves looks like this: ![]() The blue parts are the sine waves that are layered, the red part is the resulting bandlimited square wave. As you can see, it’s not just a square with rounded edges. It has these characteristic ripples.
The blue parts are the sine waves that are layered, the red part is the resulting bandlimited square wave. As you can see, it’s not just a square with rounded edges. It has these characteristic ripples.
In simple terms, the two BLEP approaches first generate a waveform just like we did, and then layer the ripples on top. Doing that removes (or greatly reduces) the aliasing.
If you’ve visited the links above, you’re maybe guessing that the PolyBLEP approach is the easiest to use. In that case, your intuition is spot-on, and that’s why we’re going to use PolyBLEPs!
The PolyBLEPOscillator Class
A PolyBLEPOscillator is an Oscillator, so we will use public inheritance. Oscillator will be the base class, and it’ll take care of:
In the SpaceBass project, create a new class called PolyBLEPOscillator and add it to all targets. If you didn’t follow the previous posts or don’t have the project, feel free to download it and start from there.
This is the class definition:
#include "Oscillator.h"

class PolyBLEPOscillator: public Oscillator {
public:
    PolyBLEPOscillator() : lastOutput(0.0) { updateIncrement(); };
    double nextSample();
private:
    double poly_blep(double t);
    double lastOutput;
};
We’re inheriting publicly from Oscillator. To override how waveforms are calculated, we define a new nextSample member function (more on that later). We add another private function called poly_blep, which will generate the ripples at the edges. The lastOutput variable saves the last output value (this will only be needed for the triangle wave).
In PolyBLEPOscillator.cpp, add the implementation for poly_blep:
// PolyBLEP by Tale
// (slightly modified)
// http://www.kvraudio.com/forum/viewtopic.php?t=375517
double PolyBLEPOscillator::poly_blep(double t)
{
    double dt = mPhaseIncrement / twoPI;
    // 0 <= t < 1
    if (t < dt) {
        t /= dt;
        return t+t - t*t - 1.0;
    }
    // -1 < t < 0
    else if (t > 1.0 - dt) {
        t = (t - 1.0) / dt;
        return t*t + t+t + 1.0;
    }
    // 0 otherwise
    else return 0.0;
}
The math may look complicated, but basically this function almost always returns 0.0, except then we’re close to an edge. The first if branch means that we’re at the beginning of a period, and the else if means that we’re right before the end. This is the right behaviour for a saw wave, because in a saw wave there’s only one jump, which is between two periods.
Before we can implement nextSample, we have to make some changes to the Oscillator class. In Oscillator.h, make the nextSample function virtual:
virtual double nextSample();
This means that we can override nextSample‘s default behaviour in our subclass. Using virtual in time-critical code isn’t the best solution performance-wise. You can avoid this by using templates (and still get away without duplicating code), but I want to keep things simple here and stick to the topic of synthesis.
Change the private: to protected:. This will allow access to things like mPhase from PolyBLEPOscillators member functions.
As described above, we will reuse the (aliased) waveforms from Oscillator as a starting point, and then layer poly_blep on top. Right now, nextSample calculates the waveform and increments the mPhase. We have to separate these two unrelated things. Add this protected member function:
double naiveWaveformForMode(OscillatorMode mode);
This function will contain the (aliased) waveform generation code. Naive in this case means that it generates the waveforms in a naive and incorrect way, without caring about aliasing. Let’s go into Oscillator.cpp and write it! (You don’t need to type this by hand, because it’s almost the same as Oscillator::nextSample)
double Oscillator::naiveWaveformForMode(OscillatorMode mode) {
    double value;
    switch (mode) {
        case OSCILLATOR_MODE_SINE:
            value = sin(mPhase);
            break;
        case OSCILLATOR_MODE_SAW:
            value = (2.0 * mPhase / twoPI) - 1.0;
            break;
        case OSCILLATOR_MODE_SQUARE:
            if (mPhase < mPI) {
                value = 1.0;
            } else {
                value = -1.0;
            }
            break;
        case OSCILLATOR_MODE_TRIANGLE:
            value = -1.0 + (2.0 * mPhase / twoPI);
            value = 2.0 * (fabs(value) - 0.5);
            break;
        default:
            break;
    }
    return value;
}
The two differences from Oscillator::nextSample are:
- We’re choosing the waveform based on the
modeparameter passed in from outside (instead ofmOscillatorMode) - The saw wave is now upwards (instead of downwards)
Since this now contains all the code from Oscillator::nextSample, we can replace nextSample with this:
double Oscillator::nextSample() {
    double value = naiveWaveformForMode(mOscillatorMode);
    mPhase += mPhaseIncrement;
    while (mPhase >= twoPI) {
        mPhase -= twoPI;
    }
    return value;
}
It just calls naiveWaveformForMode to calculate the waveform, and then increments the mPhase.
Generating PolyBLEP Waveforms
Let’s go back to PolyBLEPOscillator.cpp and implement nextSample. Start with this:
double PolyBLEPOscillator::nextSample() {
    double value = 0.0;
    double t = mPhase / twoPI;

    if (mOscillatorMode == OSCILLATOR_MODE_SINE) {
        value = naiveWaveformForMode(OSCILLATOR_MODE_SINE);
    } else if (mOscillatorMode == OSCILLATOR_MODE_SAW) {
        value = naiveWaveformForMode(OSCILLATOR_MODE_SAW);
        value -= poly_blep(t);
    }
The t variable is needed for the way the poly_blep function works. It’s the current phase divided by twoPI, so it’s between 0 and 1. The if statement distinguishes between the different waveforms. For the sine wave, we don’t have to worry about aliasing (because there are no harmonics), so we just use the naive waveform. For the saw wave, we first get the aliased waveform value from Oscillator. We then layer the output of poly_blep on top, and that’s it!
We will generate the triangle wave by first generating a square wave, and then integrating it. We’re working with discrete samples, so integrating just means summing values. If you think about it, a square wave starts with all-one values, so summing these up gives a linear rise. After half a period, the square wave jumps to all-minus-one, so summing those means a linear decay. A triangle wave is just that: A linear rise followed by a linear decay, followed by a rise and so on.
With this in mind, we’ll make a square wave for both the square and the triangle wave:
    else {
        value = naiveWaveformForMode(OSCILLATOR_MODE_SQUARE);
        value += poly_blep(t);
        value -= poly_blep(fmod(t + 0.5, 1.0));
Again, we’re starting with the naive (aliased) waveform. This time, though, we’re adding two PolyBLEPs! One at the start of a period, and the other offset by 0.5 (i.e. half a period). If you picture a square wave, it’s clear why we need two: A square wave has two jumps per period, whereas a saw wave only has one.
The only one missing is the triangle! Add this (at the end of the else block!):
        if (mOscillatorMode == OSCILLATOR_MODE_TRIANGLE) {
            // Leaky integrator: y[n] = A * x[n] + (1 - A) * y[n-1]
            value = mPhaseIncrement * value + (1 - mPhaseIncrement) * lastOutput;
            lastOutput = value;
        }
I wrote above that we just have to integrate the square wave. I don’t encourage you to try that, because it will cause the waveform to become more and more offset into very large values (which could damage your speakers). Instead, we’re using a leaky integrator. It adds the previous output, but multiplied by a value slightly below 1. This prevents the offset from accumulating.
Let’s round this off by adding the phase incrementation (this is the same as before):
    }

    mPhase += mPhaseIncrement;
    while (mPhase >= twoPI) {
        mPhase -= twoPI;
    }
    return value;
}
And just like that, the PolyBLEPOscillator is finished!
Using the new Oscillator
To use our shiny new PolyBLEPOscillator, we just have to change a few lines in Voice.h. Replace the #include "Oscillator.h" with this:
#include "PolyBLEPOscillator.h"
In the private section, turn mOscillatorOne and mOscillatorTwo into PolyBLEPOscillators:
PolyBLEPOscillator mOscillatorOne;
PolyBLEPOscillator mOscillatorTwo;
And that’s it! Run your plugin and have a look at the spectrum using SPAN. You’ll see that the aliasing is greatly reduced. Here are some screenshots for comparison. You can click on them to toggle between the old Oscillator and the new PolyBLEPOscillator:
Oscillator Saw (aliased): 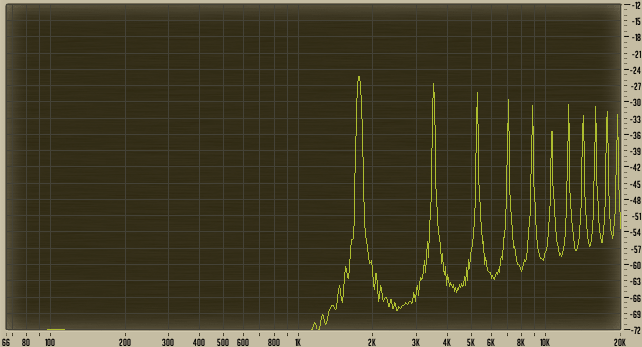
PolyBLEPOscillator Saw: 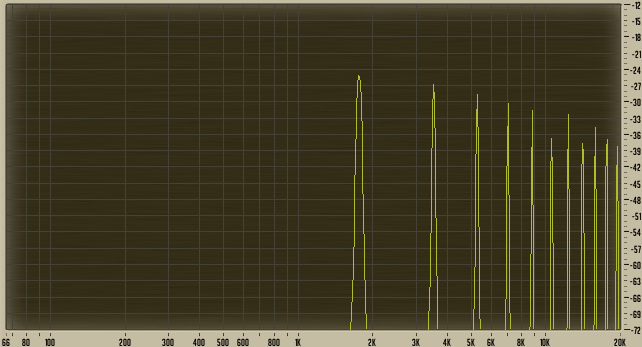
Oscillator Square (aliased): PolyBLEPOscillator Square: 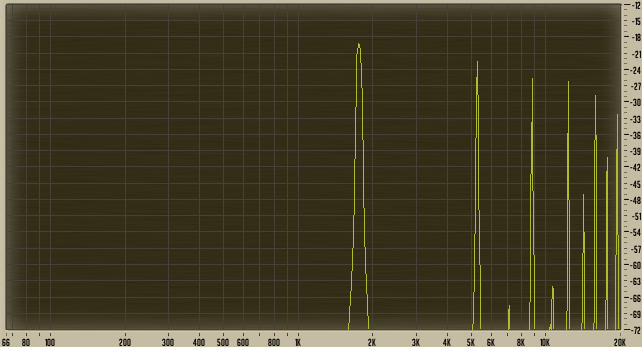
Oscillator Triangle (aliased): 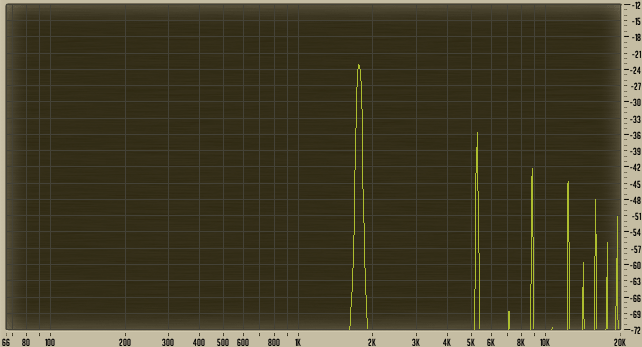
PolyBLEPOscillator Triangle: 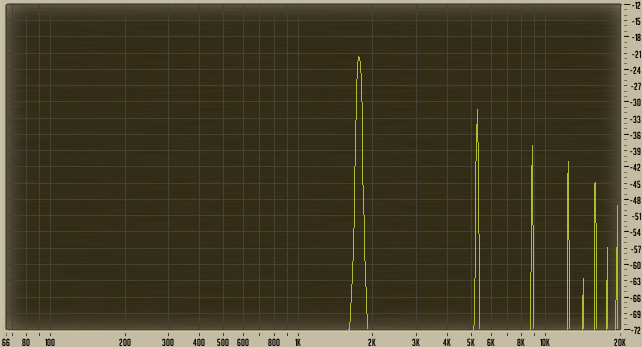
So what about the LFO?
But we’re still using the old Oscillator for the LFO! Should we use the PolyBLEPOscillator instead? Well, in an LFO you actually want the sharp edges, they can be handy for crazy sound effects. And the aliasing concern doesn’t really matter here because an LFO’s fundamental is usually very low (below 30 Hz). Each harmonic has a lower amplitude than the one below it, so the harmonics above the nyquist frequency have a very low amplitude.
Summary
We have generated anti-aliased saw and square waveforms from the aliasing counterparts by layering PolyBLEPs on top. We have generated the triangle wave by (leaky) integrating the anti-aliased square wave. We can now happily play our synth even at very high octaves without getting nasty unharmonic frequencies! You can download the source code here. Thanks for joining in and see you next time!