Let’s have a closer look at the example project from last time. The most important files are resource.h, MyFirstPlugin.h and MyFirstPlugin.cpp. The plugin is a simple gain knob – it changes the volume of the audio passing through.
Constants, Flags and Image Resources
Open resource.h from the project navigator. This file has constants for your plugin such as name, version, unique ID and image resources.
In lines 23–26 you can set the unique Plugin ID:
// 4 chars, single quotes. At least one capital letter
#define PLUG_UNIQUE_ID 'Ipef'
// make sure this is not the same as BUNDLE_MFR
#define PLUG_MFR_ID 'Acme'
The ID is important for cataloging plugins. You can register it here.
Line 56+ defines an ID and image path for the knob you see when you run the App:
// Unique IDs for each image resource.
#define KNOB_ID 101

// Image resource locations for this plug.
#define KNOB_FN "resources/img/knob.png"
In the project navigator, open Resources → img → knob.png. It’s a sprite with 60 different knob positions – each of them is 48x48 Pixels. So when you run the app and turn the knob, it doesn’t rotate the image, but rather shows a certain 48x48 Pixel portion of it.
Why not just rotate a single image? Imagine you want your knob graphic to have a glossy look and a drop shadow. If you were to rotate the graphic, the gloss and shadow would also be rotated, which is not how it looks in the real world.
Further down in resource.h, you can set the size of your plugin’s window:
#define GUI_WIDTH 300
#define GUI_HEIGHT 300
Try changing the values and run the app.
The Plugin Class Interface
Open MyFirstPlugin.h. It just contains the interface for your plugin class. The public part contains Constructor, Destructor and three member functions:
Resetis called when the sample rate is changed.OnParamChangeis called when a plugin parameter changes, for example when you turn the knob.ProcessDoubleReplacingis the core of your plugin. In this function you can process incoming audio.
In the private section there’s just a double holding the current gain value.
The Implementation
Now for the interesting part! Open MyFirstPlugin.cpp. First of all we can see a nice trick for enums:
enum EParams
{
  kGain = 0,
  kNumParams
};
By setting the first option to 0 and kNumParams at the end, kNumParams becomes the number of options (1 in this case).
The following enum uses the constants described in resource.h and sets the position of the knob in the plugin’s window:
enum ELayout
{
  kWidth = GUI_WIDTH,
  kHeight = GUI_HEIGHT,

  kGainX = 100,
  kGainY = 100,
  kKnobFrames = 60
};
It also defines the number of frames in knob.png as 60.
Below that, the constructor implementation starts by setting up the plugins’ attributes:
//arguments are: name, defaultVal, minVal, maxVal, step, label
GetParam(kGain)->InitDouble("Gain", 50., 0., 100.0, 0.01, "%");
We can’t see the value and percent sign in the GUI, but the value can be between 0 and 100, the default being 50. You may have noticed, though, that the knob isn’t at twelve o’clock. This is because of the SetShape(2.) below. Set it to 1.0 and the knob will be as you expect. SetShape gives a knob a non-linear behaviour.
Next, the constructor creates a graphic context with the right size and creates the red background:
IGraphics* pGraphics = MakeGraphics(this, kWidth, kHeight);
pGraphics->AttachPanelBackground(&COLOR_RED);
It then loads the knob.png, creates a new IKnobMultiControl with the image, and attaches it to the GUI. IKnobMultiControl is the C++ class for the GUI knob. Note how kKnobFrames is passed to indicate that the sprite contains 60 frames.
IBitmap knob = pGraphics->LoadIBitmap(KNOB_ID, KNOB_FN, kKnobFrames);
pGraphics->AttachControl(new IKnobMultiControl(this, kGainX, kGainY, kGain, &knob));
Finally, the constructor attaches the graphics context, and it creates a default preset for the plugin:
MakeDefaultPreset((char *) "-", kNumPrograms);
Let’s look at OnParamChange (bottom of the file). The IMutexLock ensures Thread Safety, a concept we will dive into later. The rest is just a switch to do the right thing depending on which parameter was changed:
case kGain:
    mGain = GetParam(kGain)->Value() / 100.;
    break;
Remember, the kGain parameter has values between 0 and 100. So after dividing by 100, we assign the result (between 0 and 1) to the private member mGain.
So far, we have looked at how a GUI is created and how it can be linked to parameters like mGain. Let’s now look at how the plugin can process incoming audio. In our case, an audio stream is a sequence of double samples, each containing the amplitude at a given point in time.
The first parameter to ProcessDoubleReplacing is double** inputs. A sequence of double values can be passed using double*. The plugin processes two (stereo) or even more channels at once, so we have several sequences of double samples, that is, double**. The first two lines in the function make it more clear:
double* in1 = inputs[0];
double* in2 = inputs[1];
Now, in1 points to the first sequence of samples (left channel), in2 to the samples for the right channel. After doing the same for the output buffer, we can iterate over the input and output buffers to process them:
for (int s = 0; s < nFrames; ++s, ++in1, ++in2, ++out1, ++out2)
{
  *out1 = *in1 * mGain;
  *out2 = *in2 * mGain;
}
For every sample, we take the input value, multiply it by mGain and write it to the output buffer. nFrames tells us how many samples there are per channel so we know how long the buffers are.
You may have noticed that when you run the app, you can hear yourself through your computer speakers. This is because by default, the standalone app takes your computer’s microphone as input. To change this (and some other audio preferences), go to the app’s preferences:

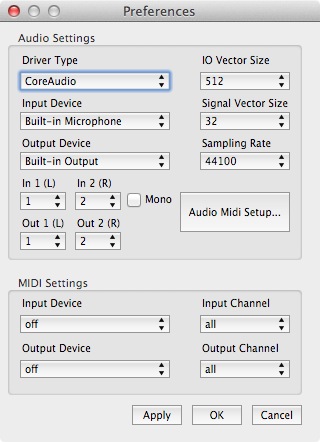
Set a breakpoint in the Reset function. Change the Sampling Rate on the right and click Apply. The debugger will break inside Reset. In the lower right where lldb is running, enter print GetSampleRate().
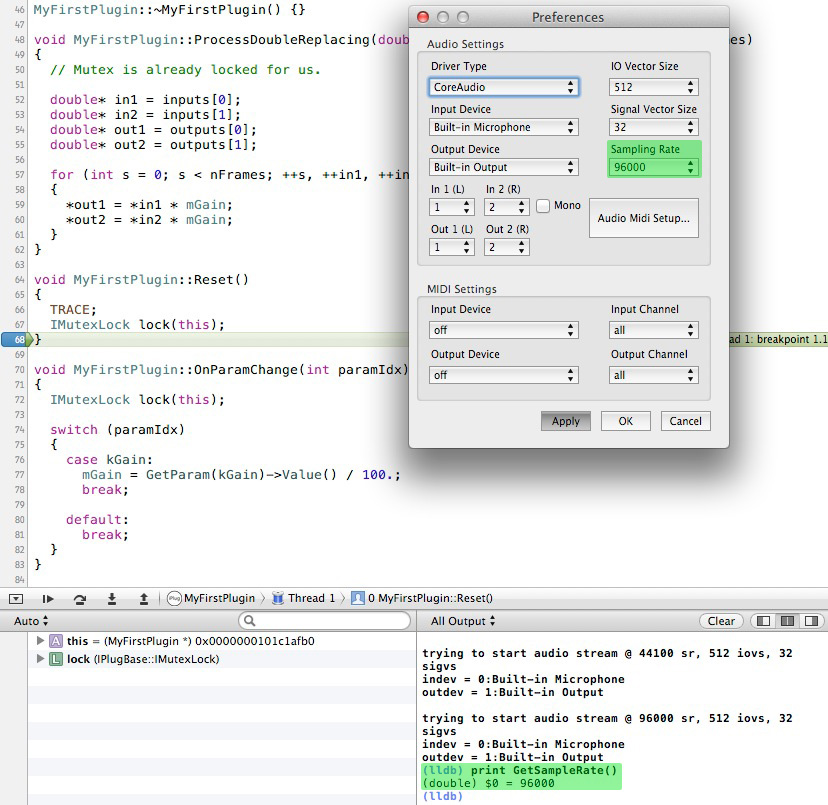
Notice how you can call any function from the debugger and it will show the correct return value. Press Stop in the upper left corner when you’re ready to move on.
Now it’s time to actually create plugin versions of our app and load them into a host. We’ll cover that in the next post!
Further Reading
To fill some gaps, read these slides by the ingenius Mr. Oli Larkin. They explain a lot of things about WDL-OL.