WDL-OL makes it very easy to turn our standalone app into a VST or AudioUnit plugin. To build a VST version, change your scheme to VST2 → My Mac 64-Bit. Hit Run and you shouldn’t get any errors, but nothing is being run! Open a Finder window and go to ~/Library/Audio/Plug-Ins/VST and you should see MyFirstPlugin.vst there. If you can’t see the Library folder in your home folder, press Cmd+Shift+G, paste in the path and hit Enter.
The following is for Mac users with Xcode. For a guide on Windows, please see below.
Debugging using Xcode
To run the plugin, we need a host. Download the 64-bit version of Reaper and drag it to your Applications folder. You can evaluate it for 60 days, after that you’re asked to purchase a license. We’re going to set things up so when we click Run in Xcode, it will start Reaper and connect the debugger. We’ll be able to use breakpoints just like with the standalone app.
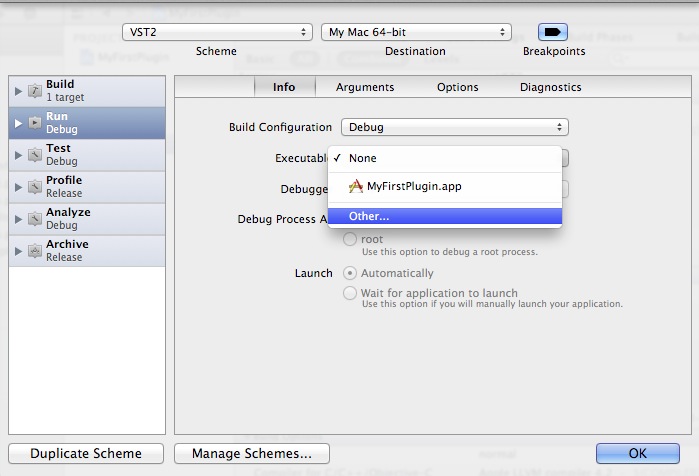
Go to Product → Scheme → Edit Scheme… and make sure you have selected Run in the list on the left side. Under Executable, select Other…:
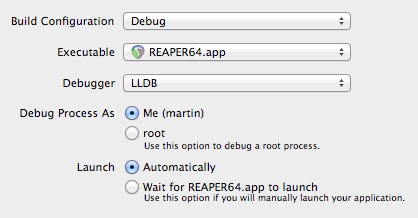
Use the dialog to find REAPER64.app. Now it should look like this:
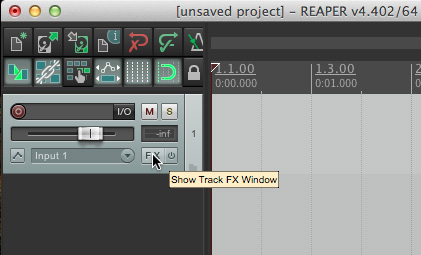
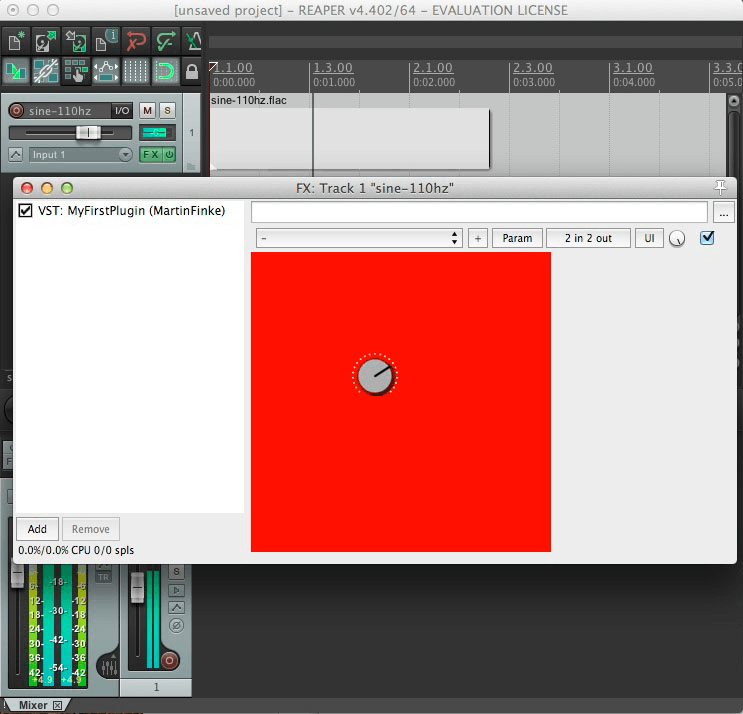
Click OK and then Run again. Reaper will start. Press Cmd+T (Ctrl+T on Windows) to insert a new Track, then click the FX button:
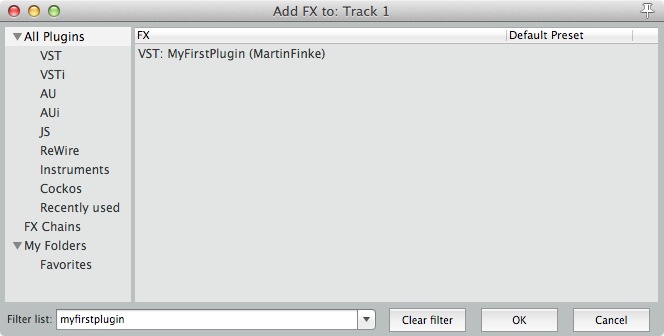
In the window that’s opened, enter myfirstplugin and it will show up:
Select it and click OK. The plugin will appear. The advantage over running standalone is that you can run any audio file through your plugin and hear what it does to the sound. This is much more interesting than being limited to your computer’s microphone. Also, you can use other plugins to inspect your own plugin’s output, which will come in handy later.
Download this file and drag it onto the Track in Reaper. Make sure you drag it all the way to the left. Hit space to start playback and you’ll hear a low tone:
For testing, it would be nice if the tone could play indefinitely until we hit space again. Hold the Cmd key and double-click the sound file in the track (below the filename). You will see how the file’s range gets selected (white). Then press R to toggle Repeat. Press space again and the tone should just keep on playing until you press it again. Turn the knob in the plugin and hear how you can change the volume!
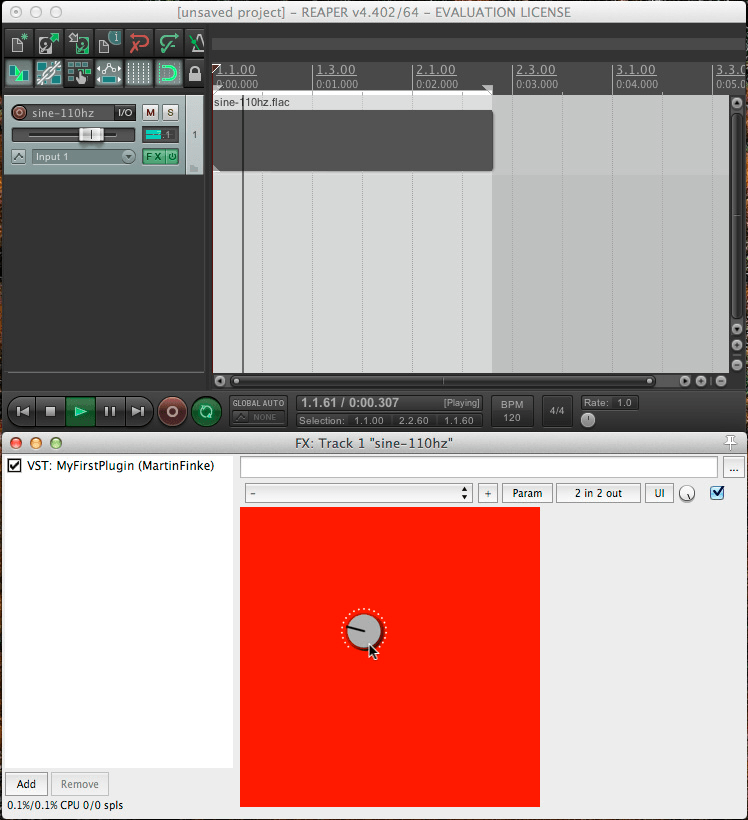
There will be click sounds while you turn the knob; this is because we’re not interpolating between values and it creates small steps in the waveform. Now hit Stop in Xcode to quit Reaper.
Building the AudioUnit version is easy: Just change the target to AU. Edit the Run scheme so it starts REAPER64.app and click Run. The plugin will be built and put into ~/Library/Audio/Plug-Ins/Components. Reaper will start and you should be able to load the AU version of your plugin just like the VST version.
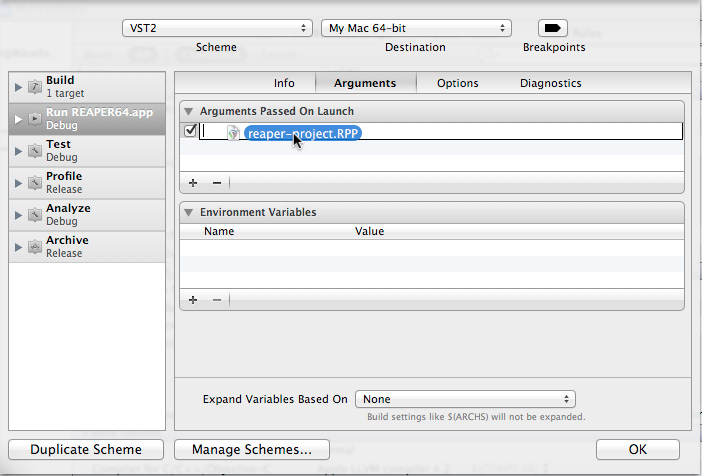
The whole process of running, creating a track etc. can get quite repetitive. I’m a big fan of optimizing things you do often. Running and testing your plugin is such a thing. When you have everything set in Reaper (i.e. your plugin is inserted on a track, and the sound is playing repeatedly), hit Cmd+S (Ctrl+S on Windows) to save the project. Save it to your Xcode project’s folder (~/plugin-development/wdl-ol/IPlugExamples/MyFirstPlugin/) and name it reaper-project.RPP.
In Xcode’s Edit Scheme screen, select the VST2 scheme at the top. Now go to the Arguments tab and click the plus button below “Arguments Passed On Launch”. Drag the reaper-project.RPP from your project folder to the newly created line:
Repeat this for the AU target. If you want, you can create a separate project for the AU version. From now on everytime you start Reaper it will run with everything in place. Awesome!
If you want, play around a little with breakpoints and see how you can inspect plugin variables even though it’s not running directly inside Xcode!
Debugging on Windows
Open Explorer and go to C:\Program Files\. Create a new folder and call it vsthost. Now download Savihost (you’ll want the savihostx86.zip) and unzip it. Copy the savihost.exe into the folder you just created:

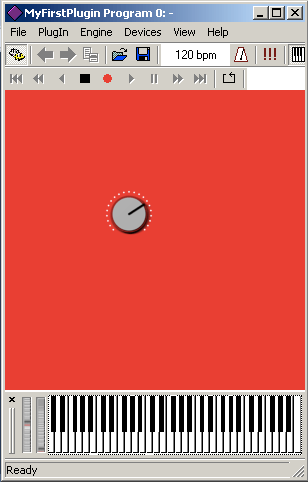
Back in Visual C++, right-click the MyFirstPlugin-vst2 project in the project explorer on the left. Select Set as StartUp Project. Press F5 and it will run your plugin as VST2 in Savihost:
If nothing appears, try clicking the different windows in the Taskbar; it should be there.
There’s one more thing to do: With the current configuration, Savihost will try to catch exceptions and prevent your plugin from crashing. This may be nice when we’re using our plugin on stage, but not for debugging purposes. In Visual C++, right-click MyFirstPlugin-vst2 (in the project explorer on the left), and click Properties. In the following dialog, select Debugging on the left. On the right, append /noexc /noft to the parameters (make sure there’s a space between each parameter):
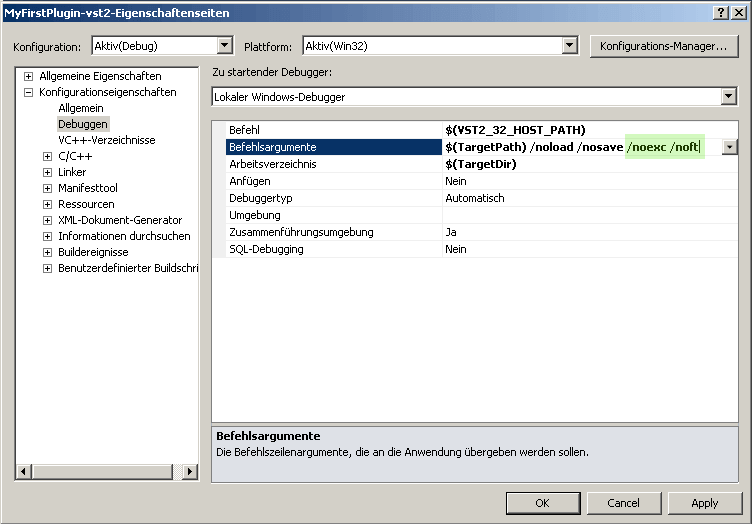
This will stop Savihost from catching exceptions, so now they will be passed through the Visual C++ debugger. Thanks to arakula for this hint!
If you try to run the VST3 version, you’ll most likely get an error like this (maybe not in German):
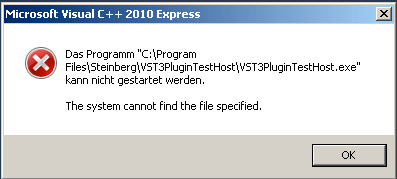
The VST3PluginTestHost.exe is part of the VST3 SDK you downloaded in part 2. Just create the folder C:\Program Files\Steinberg\VST3PluginTestHost\ and put the VST3PluginTestHost.exe in there.
Inhibit Warnings for Library Code (Mac)
This section is about Mac/Xcode. For Windows, please skip to the next section.
You may have noticed that we get a lot of warnings:

Warnings are very valuable for us because they can call our attention to possible bugs and problems with our code. The 22 warnings are from library code, so we can’t just go in there and fix them: If we update the library at some point, we’ll have to do it all over again. Just leaving them there is bad, too: If we get used to seeing the warning sign all the time, we probably won’t notice when the 22 turns into a 23 because there’s a warning about our own code.
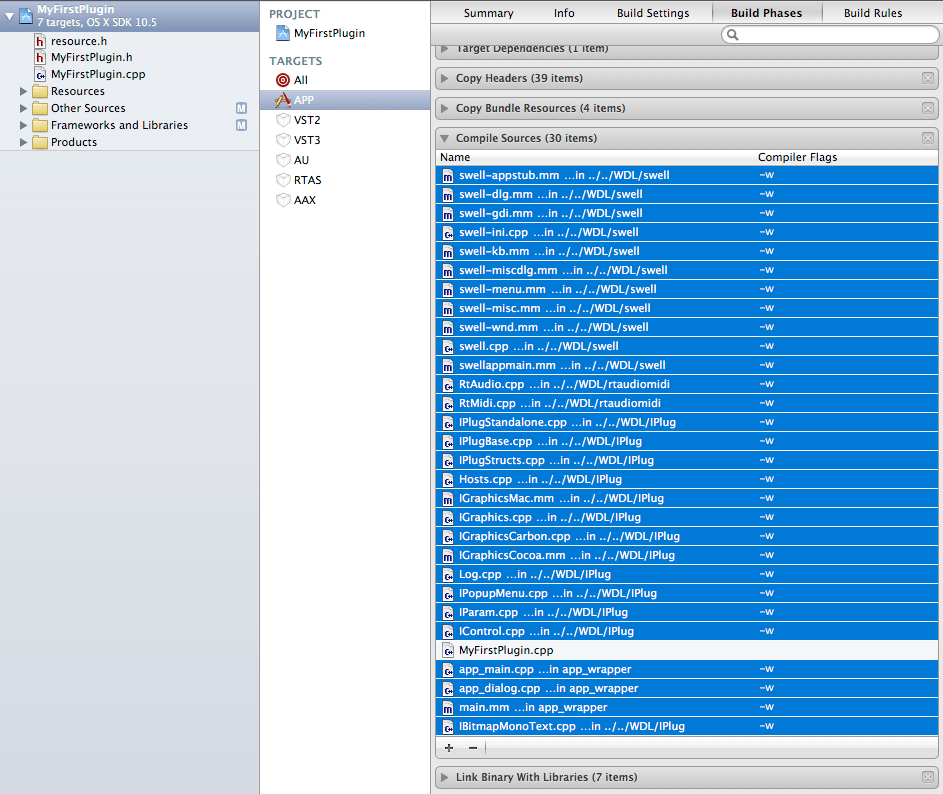
The best solution in my opinion is to inhibit warnings for library code. So when a warning appears, we know it’s relevant for us. The compiler flag to inhibit warnings is -w. Click on your project (blue icon) in the navigator, select the APP target, go to Build Phases and expand the Compile Sources section. Mark everything except for MyFirstPlugin.cpp and double-click a marked row in the Compiler Flags column. Type -w and hit enter:
Repeat this step for the VST2 and AU targets (and any other targets you want to use). Now try to build again, and you’ll get only three warnings. The warning about Validate Project Settings is easily fixed: Double-click it, uncheck everything and click Done:

Now there are only two warnings left:
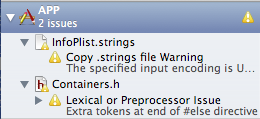
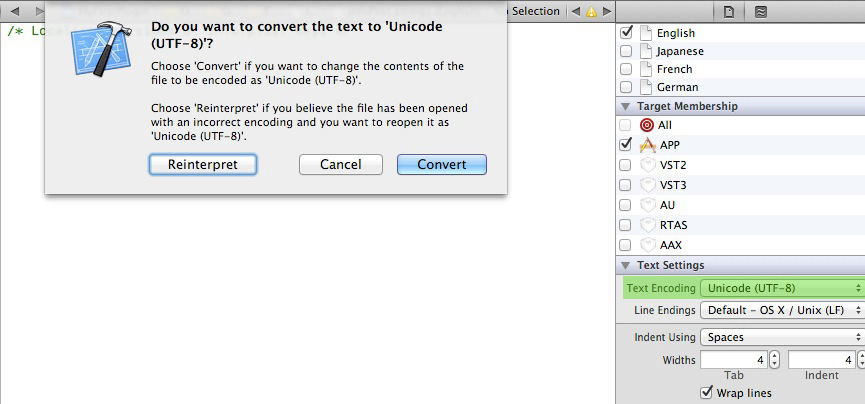
The warning about InfoPlist.strings encoding can be fixed by opening the file and setting it to UTF-8 using the Utilities on the right (click Convert):
The warning about extra tokens can be silenced by surrounding the #include directive in MyFirstPlugin.h:
#pragma clang diagnostic push
#pragma clang diagnostic ignored "-Wextra-tokens"
#include "IPlug_include_in_plug_hdr.h"
#pragma clang diagnostic pop
Now the APP and AU targets are without warnings. Building the VST2 target warns you about only one parameter on ‘main’ declaration. Let’s fix this by by surrounding the #include directive in MyFirstPlugin.cpp (not .h!):
#include "MyFirstPlugin.h"
#pragma clang diagnostic push
#pragma clang diagnostic ignored "-Wmain"
#include "IPlug_include_in_plug_src.h"
#pragma clang diagnostic pop
#include "IControl.h"
#include "resource.h"
Build again and you’ll see that there are no warnings left. Clean!
Inhibit Warnings for Library Code (Windows)
In general, VS C++ will give different warnings than the GCC/LLVM used on Mac. You can find all VS C++ 2010 warnings on the left side of this page.
For example, if you get warnings C4101 and C4129 from some .h file in WDL, you can ignore these: In MyFirstPlugin.h, put a #pragma before the #include line:
#pragma warning( suppress : 4101 4129 )
#include "IPlug_include_in_plug_hdr.h"
The suppress means that warnings will only be ignored for the next line (which is the #include). So it will still warn you about all code after the #include (which is good). Note that you only write the numbers, without the “C”. You can also do this in MyFirstPlugin.cpp:
#pragma warning( suppress : 4101 4129 )
#include "IPlug_include_in_plug_src.h"
This covers .h files from the library.
If you get warnings for a certain .cpp file, find it in the project explorer, right-click it and click “Properties”. In the dialog, select C/C++ → Advanced on the left. On the right, you should get an option like Disable certain warnings:
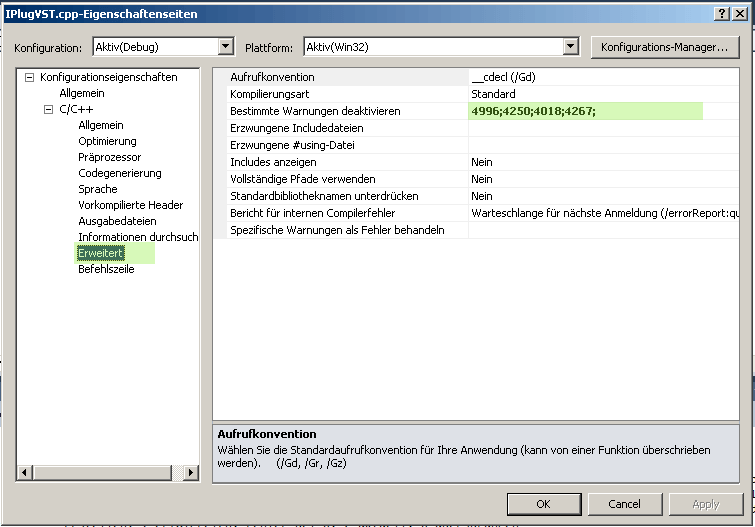
Here, you can input a list of warning numbers, separated by semicolon. As you can see, it’s already ignoring four warnings for this file. Note that changes you make here only affect this particular .cpp file. So you’ll have to find the right warning numbers for each file and put them here. If you start a new project in the future, make sure you duplicate it from this one, so you don’t have to do it again.
Clean!
Without globally “blinding” ourselves against useful compiler output, we have made it easier to see warnings that come up in our own code. In the next post we will get our hands dirty and write a nasty digital distortion plugin.