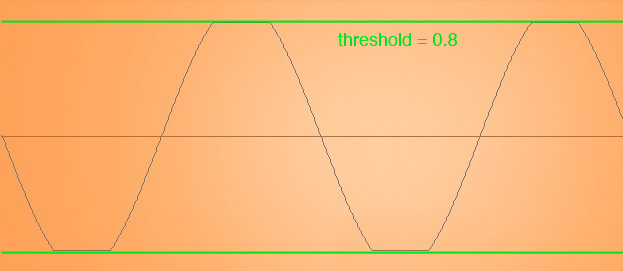
It’s time to write our first plugin, a nasty digital distortion. To be more precise, the plugin will apply clipping to the audio signal. Signal values above a certain threshold will be limited to it so that the threshold is never exceeded:
Note that by “above” I mean “above a certain positive threshold or below a certain negative threshold“.
Using the duplicate script introduced earlier, we can clone any existing project to a new project with a new name. This means that we don’t have to make all the modifications we did again for every new project.
Open a Terminal, go to your IPlugExamples folder and run:
./duplicate.py MyFirstPlugin/ DigitalDistortion YourName
If you haven’t followed the last post, you can download the files here. Make sure you don’t have any other project open in Xcode. From the newly created DigitalDistortion folder, open DigitalDistortion.xcodeproj. Verify that it builds the APP target without errors. Edit the Schemes like I’ve shown before to make sure Reaper runs for the VST2 and AU targets. Don’t forget to change the Arguments Passed On Launch to point to the right .RPP file.
Now when you run Reaper, you’ll see that instead of loading MyFirstPlugin, it has magically loaded the DigitalDistortion plugin! This is because the Reaper project file is text-based and the duplicate script replaces all occurrences of “MyFirstPlugin” with “DigitalDistortion”.
Let’s start with turning our mGain parameter into a mThreshold parameter. Go into DigitalDistortion.h and rename the private member variable:
private:
  double mThreshold;
Now open DigitalDistortion.cpp and replace (Cmd+Alt+F) all occurrences of the word Gain with Threshold. You should be able to build without errors. Change the parameter initialization in the constructor to have 0.01 as the minimum and 100.0 as the default value:
GetParam(kThreshold)->InitDouble("Threshold", 100.0, 0.01, 100.0, 0.01, "%");
Let’s implement the DSP part:
void DigitalDistortion::ProcessDoubleReplacing(
    double** inputs,
    double** outputs,
    int nFrames)
{
  // Mutex is already locked for us.

  int const channelCount = 2;

  for (int i = 0; i < channelCount; i++) {
    double* input = inputs[i];
    double* output = outputs[i];

    for (int s = 0; s < nFrames; ++s, ++input, ++output) {
      if(*input >= 0) {
        // Make sure positive values can't go above the threshold:
        *output = fmin(*input, mThreshold);
      } else {
        // Make sure negative values can't go below the threshold:
        *output = fmax(*input, -mThreshold);
      }
    }
  }
}
If you get an error that fmax and fmin are not defined, try changing the fmin call to just min, and fmax to max. If that doesn’t work, add this line to the top of DigitalDistortion.cpp:
#include <math.h>
If that still doesn’t solve the problem, try adding this line instead:
#include <algorithm>
And change the fmin to std::min, and fmax to std::max.
Although the channelCount is still hardcoded, we have removed some duplication by using an outer for loop to iterate over all channels. This means that the plugin processes the samples for one audio channel at the time before processing the next channel.
The interesting part is the if statement: For positive values we take the input value or the threshold value, whichever is lower. For negative values we take *input or the negative threshold, whichever is closer to zero.
Run the plugin in Reaper and try it on the test tone. When the knob is all the way to the right, you’ll hear a clean tone. When you turn the knob counter-clockwise, it will start to sound more and more distorted.
You’ll also notice that the signal is getting quieter the more you distort it. That’s because the threshold goes towards zero and so we’re clipping the signal to very small values. To compensate for this, divide the signal value by the threshold value:
if(*input >= 0) {
  *output = fmin(*input, mThreshold);
} else {
  *output = fmax(*input, -mThreshold);
}
*output /= mThreshold;
Remember how we changed the parameter earlier to have a minimum value of 0.01? This ensures that we’re never dividing by zero, even if we turn the knob fully counter-clockwise.
If you run the plugin again, you’ll hear that the amplitude stays the same no matter how much you distort the signal. In fact, the signal appears to become louder! The clipping turns our sine wave input into something close to a square wave, which has a higher RMS than a sine wave.
For now, I’m intentionally keeping the DSP part as simple as I can. In my opinion, a good plugin isn’t just about processing a chunk of samples. It’s a combination of:
- Solid host integration (Presets, Compatibility)
- Good sound (this is pure DSP)
- Clear user interface
- Beautiful graphics
So before we dive into more complex DSP, we will add presets and a better GUI to our plugin.