It’s time to create a better user interface for our digital distortion plugin. Here’s the look we’re going for:
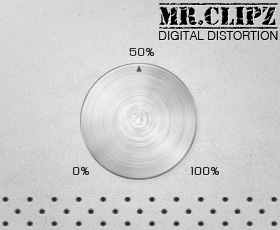
It’s not awesome, and just to demonstrate how we can add graphics and – more interestingly – how to create the rotating knob.
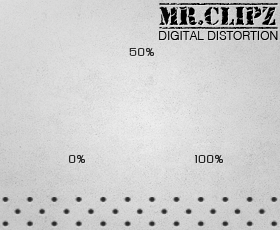
Here‘s the TIFF of the design. Open it in Photoshop (or your preferred tool) and have a look at the different layers and groups. As you can see, the only part that’s really going to change is the knob. So we can export the rest as one PNG:
Adding the Background for Mac Builds
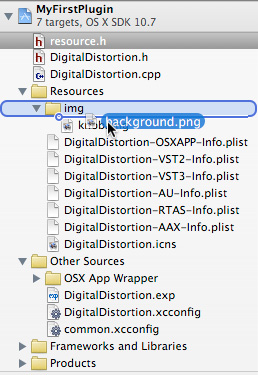
Click on the above image and save it to your desktop. Open the DigitalDistortion project in Xcode. In the project navigator, expand the Resources folder and drag your image into the img folder inside of that:
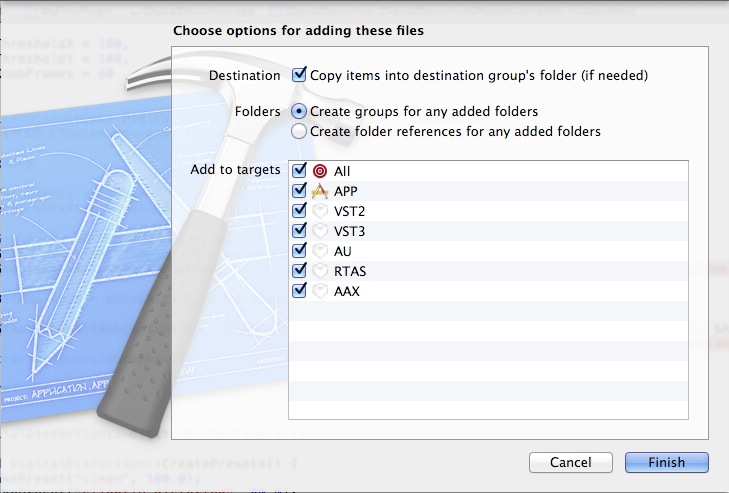
Make sure you check the Copy items into folder option and add it to all targets:
Adding the Background for Windows Builds
For Visual Studio, adding a resource (like an image) to your project is a little different. Adding to all targets on Mac means that the image will be included into the .app, .vst and .component files you ship to your users.
To achieve this with Visual Studio, edit your project’s
#include "resource.h"

KNOB_ID       PNG KNOB_FN
First, resource.h is included, so all the #defines from there are available here. The line below that declares that the knob should be included. So to include the background as well, add this line just below that:
BACKGROUND_ID PNG BACKGROUND_FN
We’ll add BACKGROUND_ID and BACKGROUND_FN to resource.h in a second.
Whenever we add an image to our project, we have to to add a line like this.
Using the Background
Let’s reference the image from our code. Go into resource.h and change the GUI size (around line 62):
// GUI default dimensions
#define GUI_WIDTH 280
#define GUI_HEIGHT 230
…and add the background image ID and filename:
// Unique IDs for each image resource.
#define KNOB_ID 101
#define BACKGROUND_ID 102

// Image resource locations for this plug.
#define KNOB_FN "resources/img/knob.png"
#define BACKGROUND_FN "resources/img/background.png"
In DigitalDistortion.cpp, change the constructor code to attach background.png instead of the red color:
// pGraphics->AttachPanelBackground(&COLOR_RED);
pGraphics->AttachBackground(BACKGROUND_ID, BACKGROUND_FN);
That was easy! Run the APP target and you’ll see the nice background:

If the background isn’t working on windows, you may have to put background.png inside the folder DigitalDistortion\resources\img\, so it’s found correctly.
Adding the knob
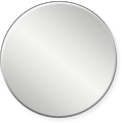
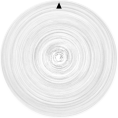
The knob is slightly more difficult. Have a look at the design again and you may see how the knob consists of a textured part and some reflections. When you turn a knob, the metal itself moves, but the lamp on your ceiling sure doesn’t! So some parts of the graphic should rotate (metal texture, the black arrow), while others should stay fixed (anything due to light). What about the “outer ring”? It has some contour, but all of that is due to incidence of light, so it shouldn’t rotate.
That’s why we can’t just export the knob in twelve-o’clock-position and rotate it at runtime.
To be more precise, there should be a knob base which doesn’t rotate. On top of that, we need the metal texture which does rotate. And finally we need another layer with the light reflections which doesn’t rotate. These are the three parts, exported separately (the black background is just added so you can see everything):
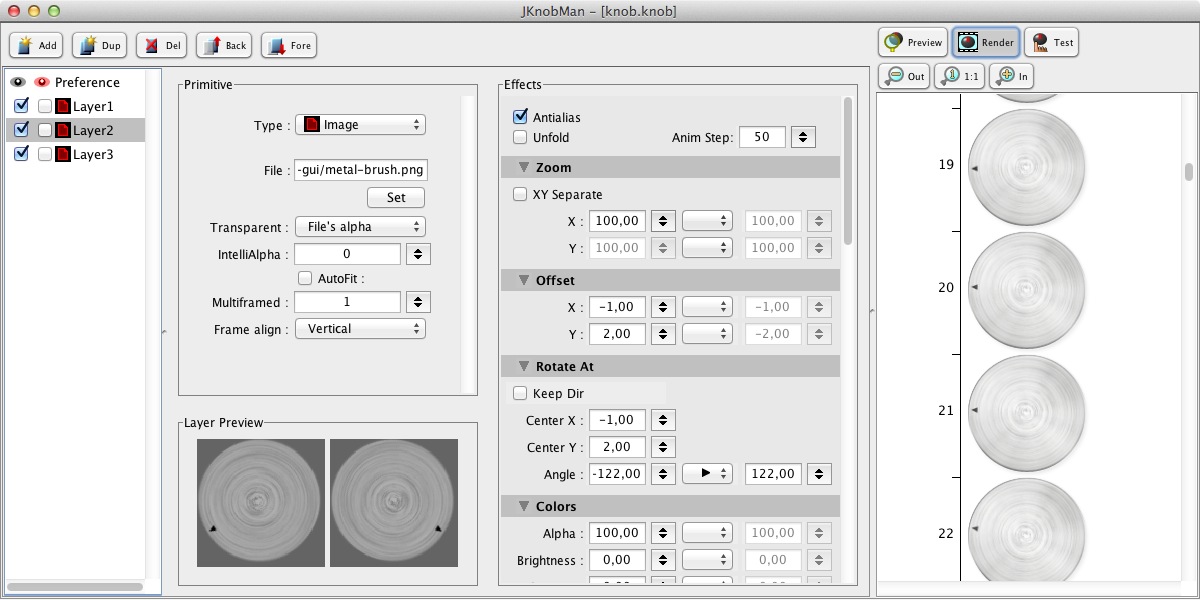
All I’ve done is add the three layers and change some coordinates so the metal texture rotates correctly without moving around. There’s a tutorial available if you want to get deeper into the software.
Export (Cmd+E, Ctrl+E on Windows) the knob to a file and name it knob.png (or download mine). The PNG has 128 frames covering all rotations, and only the metal & arrow are rotated. Nice!
Back in Xcode, right-click the existing knob.png and click Delete. In the following prompt, select Move to Trash. Now drag the knob.png onto the img folder and do everything the same way as for the background image above.
Since the filename is the same, we can leave resource.h alone. Go straight into DigitalDistortion.cpp and change the enum ELayout as follows:
enum ELayout
{
  kWidth = GUI_WIDTH,
  kHeight = GUI_HEIGHT,

  kThresholdX = 79,
  kThresholdY = 62,
  kKnobFrames = 128
};
We don’t even have to tell WDL that the knob is bigger than the previous one! We just say “the PNG has 128 frames in it” and specify where the knob should be placed.
Run your plugin as VST2 and check out how you can turn the knob and it will go through the rotation frames. What’s confusing, though, is that our plugin does distortion and having the knob at 100% gets us a clean sound!
Correcting the Knob Direction
Let’s change that in line 98:
mThreshold = 1 - (GetParam(kThreshold)->Value() / 100.);
To prevent the division by zero problem described earlier, we also have to modify line 33 so that the parameter defaults to 0 and will not exceed 99.99:
GetParam(kThreshold)->InitDouble("Threshold", 0.0, 0.0, 99.99, 0.01, "%");
If you run again, the plugin should work as expected. It might be a good idea to rename the variables from Threshold to something like DistortionAmount. The only thing still representing a threshold is the internal mThreshold variable.
Summary
With minimal DSP code we have created a working distortion plugin with a custom user interface. This was to give you an idea of what goes into creating an audio plugin – sort of the big picture.
Now that we have an overview, we’re ready to get into more interesting signal processing: The next post will be about synthesizing waveforms.
If you got stuck somewhere, you can download a ZIP with all files here.